How Do You Install an Over-the-Range Microwave Oven in 7 Easy Steps?
To install an over-the-range microwave in 7 easy steps, start by gathering your tools and clearing the area.
Installing an over-the-range microwave requires careful preparation to ensure safety and proper function. Next, locate wall studs and mark mounting spots precisely.
Attach the mounting plate securely to the wall, then prepare the upper cabinet, drilling a hole for the power cord if needed.
With help, lift and hang the microwave on the plate, secure it with bolts, connect ventilation, and plug it in.
Test for proper operation, and you’ll be ready to explore more detailed tips.
Key Takeaways
- Gather tools, mounting template, and clear the installation area by unplugging and moving the range.
- Use a stud finder to locate studs, mark positions, and apply the mounting template at 54 inches height.
- Drill holes and securely attach the mounting plate to wall studs, ensuring it is level.
- Lift and hook the microwave onto the mounting plate, then secure it with bolts and check level alignment.
- Connect ventilation, plug in the microwave, and test all functions including power, heating, and fan.
Gather Tools and Prepare the Installation Area
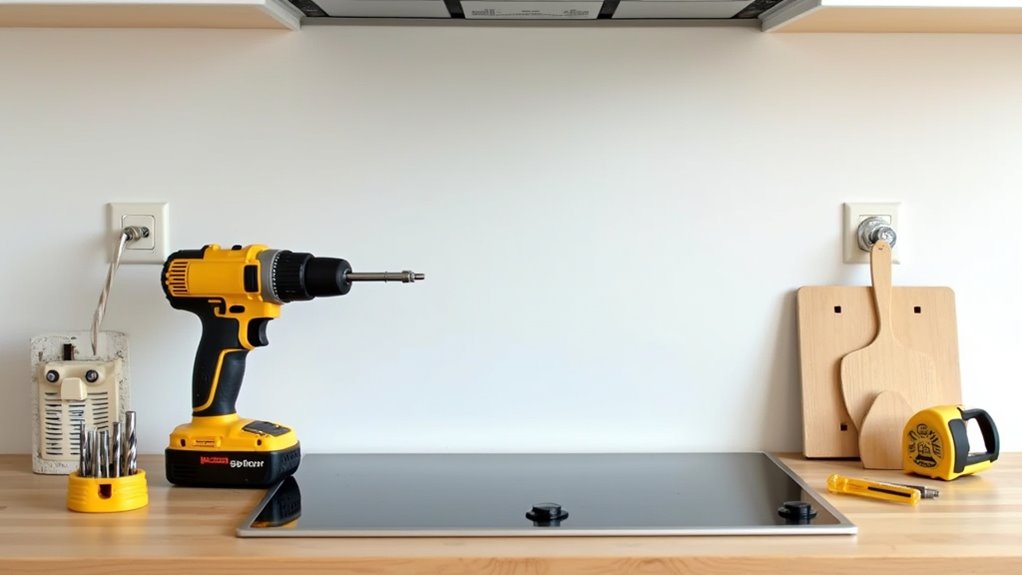
Before you begin, gather all the necessary tools like a measuring tape, stud finder, drill with bits, level, and a drop cloth to protect your floor. Having these ready simplifies the installation process.
Next, collect the mounting templates included with your microwave; these are essential for precise placement. Prepare the work area by unplugging the range and moving it to create a clear space for installation. Verify microwave height to confirm it won’t be installed too high—ideally no more than 54 inches from the floor—for safe and convenient use.
Also, check for a nearby electrical outlet inside the cabinet to power your microwave. Use a level for alignment, confirming the mounting templates are square, which guarantees your microwave will be installed flawlessly.
Locate Wall Studs and Mark Mounting Points
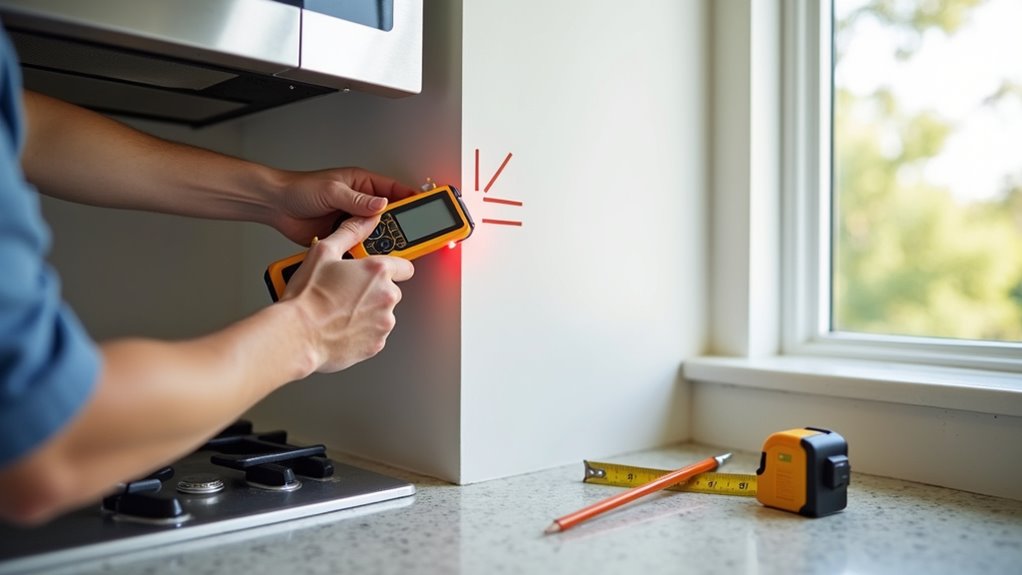
When you’re ready to mount your microwave, start by using a stud finder to locate the wall studs behind the installation area, as these will provide the strong support needed. Mark each stud location with a pencil, noting they’re typically spaced 16 inches apart.
Next, use the installation template that came with your microwave to identify where the mounting plate will go, usually about 54 inches from the floor. Draw a horizontal line at this height, ensuring it’s level and square. Double-check that your marked locations align with the template’s guides for the mounting hardware.
Accurate placement on the wall studs is essential because the mounting plate must be securely fastened to these supports to hold your microwave safely and firmly.
Attach the Mounting Plate to the Wall
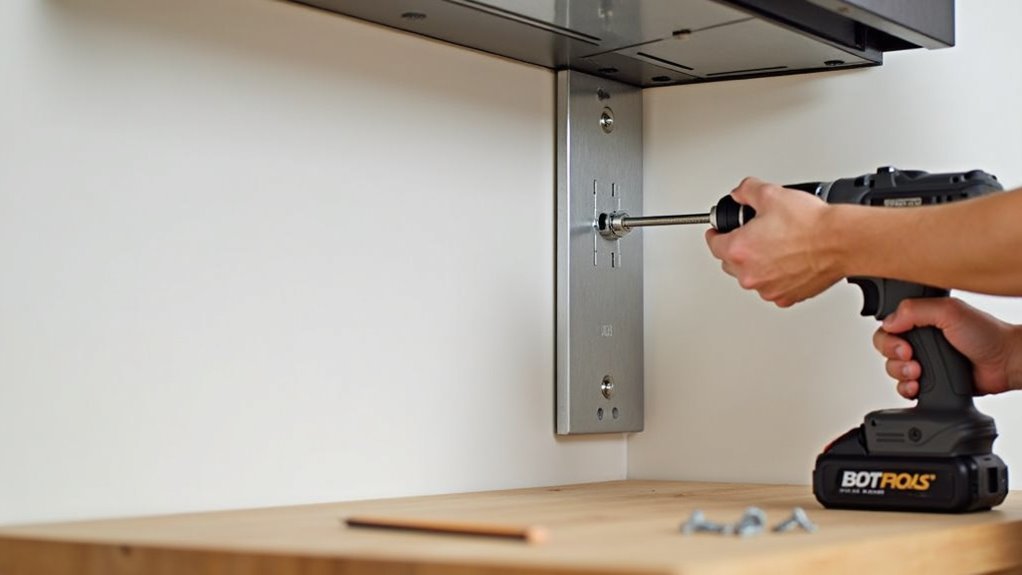
Now that you’ve marked the wall studs and confirmed the mounting points, it’s time to attach the mounting plate. First, align the mounting plate with the marked stud positions, making sure it’s level before marking where you’ll drill holes. Once you’ve marked their positions, use a drill with the correct bit size to create holes in the wall.
This guarantees a secure mounting for your microwave. After drilling, position the mounting plate back on the wall and secure it firmly by inserting bolts through the bottom into the holes. Tighten these bolts to assure the plate is held tightly in place.
Taking these steps carefully will set a strong foundation as you install an over-the-range microwave, assuring safety and stability during use.
Prepare the Upper Cabinet and Drill Power Cord Opening
Since the upper cabinet will house the microwave, you’ll want to clear out any contents to create a safe, accessible workspace. Use a stud finder to locate the wall studs behind the cabinet and mark their positions with a pencil for secure mounting.
Next, apply the provided template to the underside of the upper cabinet. This will guide you in accurately positioning both the mounting holes and the power cord opening. Carefully drill a hole following the template guidelines, making sure it’s large enough for the power cord to pass through without obstruction but not so big that it weakens the cabinet’s structure.
Taking these steps guarantees a precise fit and secure mounting for your over-the-range microwave oven.
Lift and Hang the Microwave on the Mounting Plate
Grab a helper and carefully lift the microwave, hooking its top edge onto the mounting plate secured to the wall. Once the microwave is on the mounting plate, align it properly before pushing it back until it clicks into place. This guarantees the microwave is securely held and ready for final adjustments.
When you install the microwave, keep these points in mind:
- Lift the microwave steadily with assistance to avoid damage.
- Align the microwave with the mounting plate for a proper fit.
- Check that the microwave is flush with the bottom of the upper cabinet.
- Make sure it’s level to maintain a clean, professional look.
- Confirm it’s securely hanging before proceeding to the next step.
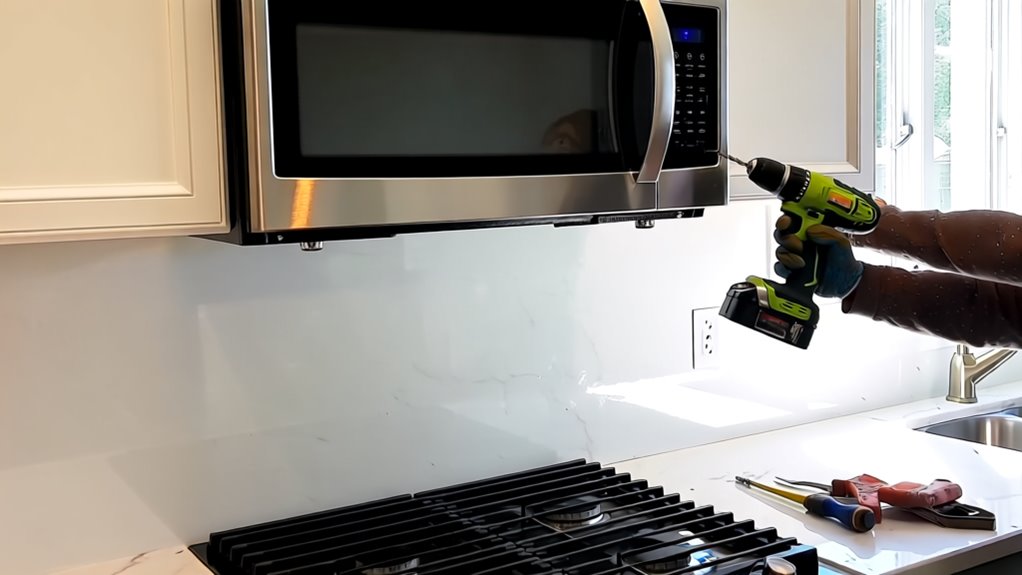
Secure the Microwave With Bolts and Connect Ventilation
Now that the microwave is properly positioned, you’ll want to secure it with the bolts specified by the manufacturer to keep it stable.
After fastening, connect the ventilation system, whether that’s attaching the ductwork for external venting or installing the charcoal filter for recirculation.
Make sure all connections are tight and correctly aligned for safe and efficient operation.
Bolt Installation Tips
To secure your over-the-range microwave, start by using the bolts included in the installation kit to firmly attach it to the mounting plate on the wall. Follow these bolt installation tips to guarantee a secure installation and proper ventilation system setup:
- Always refer to the manufacturer’s installation guide for exact bolt placement.
- Use the mounting bracket as your main support point.
- Tighten the bolts evenly until the microwave feels stable and doesn’t wobble.
- Confirm that the microwave is flush against the wall before fully tightening bolts.
- Connect the ventilation system properly, ensuring ducts or filters are securely attached.
Ventilation Connection Guide
Once your microwave is securely bolted to the mounting plate and feels stable, it’s time to connect the ventilation system. Follow the installation manual carefully to attach the ductwork for outside venting or set up the internal fan for recirculating venting. Properly securing all connections prevents airflow issues and guarantees peak performance of the exhaust fan and microwave.
| Task | Key Point |
|---|---|
| Tighten bolts | Confirm microwave is firmly in place |
| Connect ductwork | Follow manufacturer’s guidelines |
| Set recirculating venting | Use only if recommended, avoid gas stoves |
| Check all ventilation points | Prevent leaks for peak airflow |
Plug In and Test the Microwave for Proper Operation
After securing your microwave with bolts, plug it into the outlet inside the upper cabinet and make certain the circuit breaker is switched on before testing. To guarantee proper operation, conduct a thorough functionality test. Here’s what to do:
- Confirm the power supply is active and the microwave is properly plugged in.
- Set the microwave for a short cooking time to test heating.
- Check that the exhaust fan runs smoothly.
- Verify additional features like lights function correctly.
- Consult the manufacturer’s manual for troubleshooting if anything seems off.
Frequently Asked Questions
Can I Install an Over the Range Microwave Myself?
Yes, you can install an over-the-range microwave yourself, but having someone to help lift and hold it makes the process safer and easier. Make sure you have the right tools, like a drill and stud finder, and follow the manufacturer’s instructions closely.
Check that there’s an electrical outlet nearby and mount it securely to wall studs. If you’re unsure about wiring, it’s best to call an electrician to avoid any hazards.
What Holds an Over the Range Microwave in Place?
Think of your over-the-range microwave as a bird perched securely on a branch. What holds it in place are the sturdy mounting plate attached to the wall studs, acting like the branch, and bolts that fasten it to the cabinet above, like the bird’s claws gripping tight.
These work together to balance the microwave’s weight and keep it steady, so you can trust it’ll stay put while you cook up a storm.
How Does an Over the Range Microwave Attach?
An over-the-range microwave attaches by mounting a bracket to your wall studs, providing strong support. You’ll align the microwave’s mounting plate with these studs and secure it using screws.
Then, you lift the microwave onto this bracket, and bolts or screws fasten it to the cabinet above. This dual attachment keeps the microwave stable and secure, so make sure you have help lifting it safely into place.
Does an Over the Range Microwave Need to Be Vented Outside?
You might be surprised, but an over-the-range microwave doesn’t always have to be vented outside. Some models recirculate air back into your kitchen, which can work if you don’t have ductwork or prefer a simpler setup.
However, if you use a natural gas stove, it’s essential to vent outside for safety and effective removal of heat and fumes. Always check your microwave’s guidelines to know what’s best for you.
Conclusion
Now that you’ve followed these simple steps, your over-the-range microwave will be hanging like a champ, ready to make your kitchen life easier. With the mounting plate secure and connections tight, you’re just a plug-in away from convenience at your fingertips.
Remember, taking your time guarantees everything fits like a glove. Proper installation of your over-the-range microwave ensures safety and optimal performance. So go ahead, test it out, and enjoy the smooth hum of your new kitchen companion working its magic!