How to Clean a BBQ Grill Using the Best Tools and Materials
To clean your BBQ grill effectively using the best tools and materials, start by avoiding wire brushes and harsh chemicals that can damage surfaces or leave harmful residues.
Instead, use wooden scrapers and nylon brushes to safely remove grease without scratching. Soak grates in warm, soapy water, then rinse well.
Don’t forget to clean your grease tray and drip pan regularly to prevent buildup.
Using these right tools and methods keeps your grill safe and performing well. Keep exploring for a detailed cleaning approach and maintenance tips.
Key Takeaways
- Use wooden scrapers and nylon brushes to clean grill grates safely without damaging surfaces or risking metal bristle contamination.
- Avoid wire brushes, steel wool, and harsh chemicals that can scratch grills or leave harmful residues.
- Prepare two bins with warm soapy water and clean water for soaking and rinsing grill parts efficiently.
- Regularly clean grease trays and replace drip pans to prevent flare-ups and maintain grill hygiene.
- Consider professional steam cleaning services for deep grease removal and thorough grill maintenance.
Why Choosing the Right Grill Cleaning Tools Is Essential
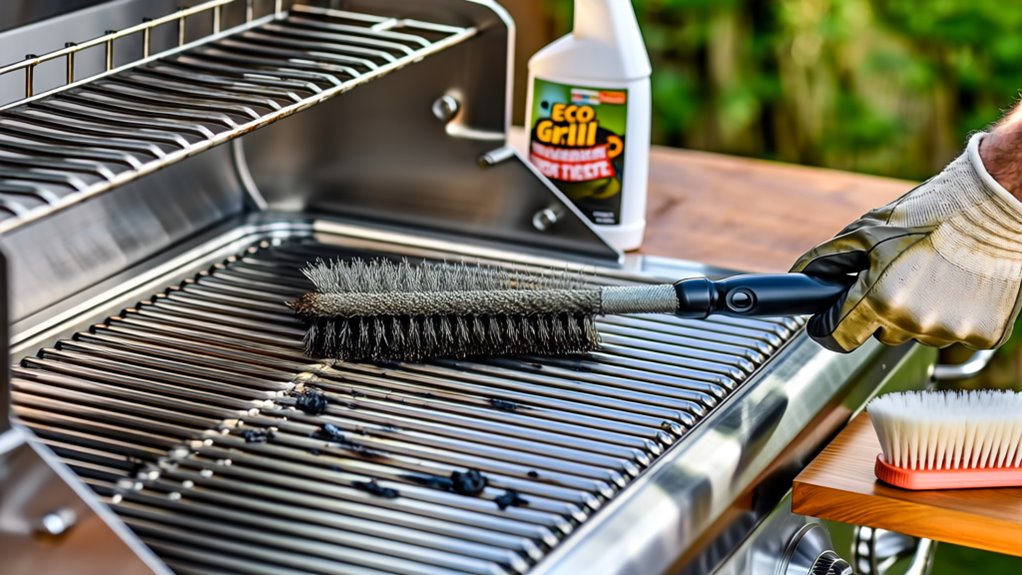
Because using the wrong tools can damage your grill and even pose health risks, choosing the right grill cleaning tools is vital. If you pick harsh tools like wire brushes, you risk scratching the grill’s surface or even leaving behind metal bristles that could stick to your food.
Instead, opt for safer options like wooden scrapers or nylon brushes. Wooden scrapers effectively remove residue without damaging the grill grates, preserving your grill’s finish and longevity.
Choose wooden scrapers or nylon brushes to clean your grill safely without damaging the grates.
Clean grill surfaces also help prevent grease buildup, which is significant because grease can cause flare-ups and uneven heating during cooking. Uneven heating not only affects your food’s taste but can also shorten your grill’s life.
Using proper grill cleaning tools regularly guarantees your BBQ performs well and stays safe to use. So, by choosing the right tools, you’re protecting both your grill and your health.
Common Grill Cleaning Tools to Avoid
While it might be tempting to grab whatever’s handy for cleaning your grill, certain tools can do more harm than good. Avoid these common cleaning tools to keep your grill safe and performing well.
- Wire brushes: They may seem like a one-stop solution, but they can shed metal bristles that embed in food, posing serious health risks.
- Steel wool and abrasive pads: These scratch your grill’s protective finish, leading to rust and corrosion over time.
- Chemical sprays: Though effective, they often leave harmful residues on cooking surfaces, compromising food safety.
- Cheap cleaning tools: Inexpensive options can damage your grill and fail to remove deep grease buildup, causing flare-ups and uneven heating.
Choosing the wrong tools risks both your health and your grill’s lifespan, so steer clear of these to maintain even heating and safe cooking.
Safe and Effective DIY Cleaning Tools for Your Grill
Steering clear of harmful cleaning tools is just the first step to keeping your grill in top shape. To clean inside the grill effectively, wooden scrapers are a great DIY option. They mold to the shape of your grill grates, letting you clean every edge without scratching or damaging the surface.
Instead of wire brushes, try nylon or bristle-free brushes—they’re much safer and cut down the risk of metal bristles breaking off and contaminating your food. Using grill-safe sprays helps break down grease without leaving harmful residues on cooking surfaces. For a deep clean, consider steam cleaning; it loosens stubborn grease with just heat and water, avoiding harsh chemicals.
Preparing Your Grill for a Thorough Cleaning
Before you start cleaning, make sure to gather all your supplies like dish soap, a grill brush, and gloves. Set up your workstation with bins of soapy and clean water, and protect the area around your grill with a tarp or trash bags.
Having everything ready and nearby will make the process smoother and keep the mess contained.
Gather Cleaning Supplies
You’ll need a few essential supplies to get your BBQ grill thoroughly clean and ready for your next cookout. Start by gathering two plastic bins: one for soaking the grates and grease trays in warm, soapy water, and the other for rinsing with clean water. Protect your work area with a tarp or trash bags to catch grease and debris, making cleanup easier.
Make sure you have dish soap on hand—it’s great for breaking down grease. Don’t forget rubber gloves to keep your hands safe from grime and cleaning agents. Finally, equip yourself with a grill brush, scraper, and stainless-steel wool to tackle stubborn buildup.
Here’s a quick list to help you gather everything:
- Two plastic bins (soak and rinse)
- Tarp or trash bags
- Dish soap and rubber gloves
- Grill brush, scraper, and stainless-steel wool
Set Up Workstation
Once you’ve gathered your cleaning supplies, it’s time to set up a workstation that keeps your area tidy and your tools within easy reach. Start by laying down a tarp or trash bags to catch grease and debris during cleaning. Place two plastic bins nearby—fill one with warm soapy water for soaking grates, and the other with clean water for rinsing.
Keep your grill’s grease tray in place at first to catch falling debris as you scrape and brush the grates and flavorizer bars. Arrange essential materials like rubber gloves, grill brushes, scrapers, and stainless-steel wool close by to streamline the process. Finally, choose a well-ventilated spot so odors dissipate quickly, making your cleaning session more comfortable and efficient.
Protect Surrounding Area
To protect the area around your grill, start by laying down a tarp or trash bags to catch grease and debris. This prevents stains and simplifies cleanup.
Next, organize your tools and materials within easy reach to avoid unnecessary movement. Keep the grease tray in place at first to catch drippings and make debris removal easier.
Finally, use two plastic bins: one with warm soapy water for soaking grates and another with clean water for rinsing. Here’s a simple checklist:
- Lay tarp or trash bags around the grill.
- Arrange all cleaning tools nearby.
- Leave the grease tray in place initially.
- Prepare two bins for washing and rinsing.
Following these steps keeps your workspace tidy and protects the surrounding area during cleaning.
Step-by-Step Guide to Scraping and Soaking Grill Components
Start by setting up two plastic bins—one with warm, soapy water for soaking grates and flavorizer bars, and another with clean water for rinsing. Use a wire grill brush and scraper to remove built-up debris from the cooking grates and flavorizer bars, working directly over the grill so the scrapings fall into the grease tray, minimizing mess.
Once scraped, place the grates and bars in the soapy water to loosen grease effectively. After soaking, scrub them thoroughly with stainless-steel wool and a bristle brush before rinsing them in the clean water bin.
When cleaning the cookbox and burner tubes, scrape debris gently from top to bottom into the grease tray, being careful not to damage or remove the burner tubes. Finish by scrubbing the grease tray, replacing the disposable drip pan, and making sure all surfaces—including inside cabinets and the grill exterior—are clean and ready for your next BBQ session.
Proper Techniques for Scrubbing Grates and Flavorizer Bars
Scrubbing your grates and flavorizer bars effectively is key to keeping your grill running smoothly and preventing flare-ups. Once you’ve scraped off the loose debris and soaked your parts, follow these steps for a thorough clean:
- Grab a wire grill brush or scraper and work directly over the grill to remove remaining buildup without making a mess.
- Use grill floss to get between the grates and into tight spots where residue hides.
- Scrub with stainless-steel wool to tackle stubborn, carbonized grease. This tool is gentle enough to avoid damage but tough on grime.
- Rinse everything in clean water to wash away loosened debris and soap.
Your goal is to remove caked-on grease, not to make the grates look brand new. This focused cleaning keeps your grill efficient and reduces flare-ups during your next cookout.
Cleaning the Cookbox and Burner Tubes Safely
Although it might seem tedious, cleaning the cookbox and burner tubes carefully is crucial for maintaining your grill’s performance and safety. Start at the top of the cookbox and work downward, preventing debris from settling on cleaned areas. Use a grill-safe grease spray to loosen stubborn buildup before scraping.
When cleaning burner tubes, never remove them. Instead, gently scrape with a plastic scraper to avoid damaging connections. Finish by wiping the cookbox with a damp rag to clear loose particles and guarantee a clean cooking environment.
| Task | Tip |
|---|---|
| Cookbox cleaning | Start top to bottom to avoid re-soiling |
| Burner tubes | Use plastic scraper, avoid removal |
| Grease spray | Loosens debris for easier cleaning |
| Final wipe | Use damp rag to remove loosened particles |
These steps keep your grill safe and working efficiently.
Maintaining the Grease Tray and Drip Pan
To keep your grill running safely, you need to regularly clean the grease tray to prevent buildup that can cause flare-ups. Don’t forget to replace disposable drip pans when they’re worn out to catch grease effectively.
Staying on top of these tasks helps prevent grease from hardening and keeps your grill in great shape.
Grease Tray Cleaning Tips
Since grease buildup can cause flare-ups and fire hazards, you should clean the grease tray after every grilling session. Keeping it clean not only prevents dangerous fires but also extends your grill’s lifespan. Here’s how to do it effectively:
1. Use a plastic scraper to gently remove hardened grease without scratching the tray. 2. Soak the tray in warm, soapy water for at least 30 minutes to loosen stubborn residue. 3. Scrub with a non-abrasive pad to clean thoroughly without damaging the surface.
4. Replace disposable drip pans regularly to keep the area hygienic and deter pests.
Remember to dispose of grease and scrapings safely away from your grill to maintain a clean, safe cooking environment.
Drip Pan Replacement Guide
Keeping your grease tray clean goes hand in hand with regularly inspecting and replacing the drip pan. You’ll want to check it often to prevent grease buildup, which can cause dangerous flare-ups and fire hazards while grilling.
A clean drip pan also keeps airflow steady and stops unpleasant odors from lingering inside your grill. Choose a disposable or washable drip pan that fits your grill model perfectly for easy maintenance. Don’t forget to safely dispose of the collected grease to avoid attracting pests.
For added convenience, consider lining the drip pan with aluminum foil; it makes cleanup quicker and helps extend the pan’s lifespan. Staying on top of drip pan care will keep your grill running smoothly and safely every time you fire it up.
Preventing Grease Buildup
Although it might seem like a small detail, regularly emptying and cleaning your grease tray and drip pan is essential for preventing dangerous grease buildup. Here’s how you can keep them in top shape:
- After each grilling session, check and empty the grease tray to avoid overflow and flare-ups. Use a disposable drip pan with the grease tray to catch extra grease and simplify cleanup.
- Clean the grease tray with warm soapy water and a non-abrasive scrubber to remove residue and prevent corrosion. Regularly inspect both the tray and pan for cracks or damage to prevent leaks and pest attraction.
Stick to a routine cleaning every 5-10 uses to maintain grill performance and keep your cooking safe.
Final Cleanup Tips for a Spotless Grill
Once you’ve cleaned the grill grates and interior, don’t forget to tackle the grease tray and disposable drip pan to prevent buildup. Make certain you thoroughly clean the grease tray and replace the disposable drip pan to keep everything fresh and avoid future messes.
Next, scrub the inside of the grill cabinets and the exterior surfaces to maintain a clean appearance and stop grease from accumulating. After cleaning, properly dispose of the water and scrapings away from the grilling area to keep pests at bay and maintain hygiene. Be sure to tie up the trash bag containing scrapings securely to prevent leaks or odors that could attract unwanted critters.
Finally, wipe down all grill surfaces with a wet rag to remove any remaining loose particles. Following these final cleanup tips guarantees your BBQ grill stays spotless and ready for your next cookout.
Benefits of Professional Grill Cleaning Services
When you choose professional grill cleaning services, you get access to expert equipment that tackles deep grease buildup more effectively than DIY methods. This thorough cleaning not only improves your grill’s performance but also creates a safer cooking environment by reducing harmful residues.
Plus, trained technicians guarantee every corner of your grill is spotless, saving you time and effort.
Deep Cleaning Advantages
Since professional grill cleaning services use high-heat, eco-friendly steam, they can remove hidden grease buildup that DIY methods often miss. When you choose experts, you get a deep clean that enhances your grill’s performance and longevity.
Here’s what you gain:
- Access to all grill corners, ensuring no grime hides away.
- A thorough cleaning in just one appointment, saving you time.
- Extended grill lifespan due to regular maintenance by pros.
- Hassle-free service that lets you focus on grilling and enjoying your meals.
Health and Safety Benefits
Although you might be tempted to clean your grill yourself, professional grill cleaning services offer health and safety benefits that DIY methods often miss. Experts use high-heat, eco-friendly steam to eliminate hidden grease and bacteria, creating a safer cooking environment for you and your family. They clean every corner of your grill thoroughly, removing residues that could harbor harmful bacteria or cause flare-ups during cooking.
This deep cleaning reduces fire risks and guarantees your food is prepared on a healthier surface. Additionally, professionals prevent rust and corrosion by addressing grease build-up that damages your grill over time. By choosing professional services, you’re not just maintaining your grill’s performance but also protecting your health and safety while enjoying every barbecue.
Expert Equipment Access
Keeping your grill safe and hygienic is just one part of proper maintenance. When you opt for professional grill cleaning services, you gain access to expert equipment and techniques that DIY methods simply can’t match.
Here’s why you should consider it:
1. Professionals use high-heat, eco-friendly steam to remove hidden grease and buildup, ensuring a healthier cooking surface. 2. Trained technicians clean all corners, preventing flare-ups and uneven heating. 3. One appointment can restore your grill’s peak condition, extending its lifespan and boosting performance.
4. Regular cleanings eliminate leftover food and grease, reducing pests and keeping your outdoor space cleaner.
Frequently Asked Questions
What Is the Best Thing to Clean a Barbecue Grill With?
The best thing to clean a barbecue grill with is a wooden scraper paired with a nylon or bristle-free brush. These tools prevent damage and reduce the risk of metal bits contaminating your food.
For tougher grime, using a grill-safe spray and steam cleaning helps break down grease naturally without harsh chemicals. Regularly using these methods keeps your grill performing well and guarantees your food stays safe and tasty every time.
Why Do Mexicans Use Onions to Clean Grills?
Mexicans use onions to clean grills because the natural juices and acidity help break down grease and stuck-on bits easily. When you rub a hot grill with an onion, its juices steam and lift debris while adding a subtle flavor.
It’s an eco-friendly, chemical-free way that’s rooted in tradition and super effective. Plus, you’re using something you probably already have, making cleanup simple and resourceful.
What Does Rubbing a Potato on a Grill Do?
Rubbing a potato on your grill is like giving it a gentle hug that melts away grime. When you heat the potato on the grates, its moisture creates steam, loosening stuck-on food. The natural starches and enzymes help break down grease, making cleaning easier without harsh chemicals.
Plus, it’s a safe, eco-friendly way to keep your grill in top shape, avoiding the risk of metal bristles contaminating your food.
What Types of Tools Can You Use to Clean a Barbecue and What Is Each Tool Best For?
You can use wooden scrapers to mold around grates and clean deeply without scratching. Nylon or bristle-free brushes are great for safe scrubbing without risking metal bristles in your food. Grill-safe sprays help remove grease without harmful residue.
Steam cleaners loosen grime naturally with heat and water, and stainless-steel wool tackles tough, baked-on residue—just be gentle to avoid damaging the grill’s finish. Each tool suits different cleaning needs perfectly.
Conclusion
Now that you’ve mastered the ultimate grill cleaning arsenal, your BBQ will shine brighter than the sun on a summer’s day! Forget scrubbing forever—this is grill care so effortless, even your cat could do it (if they had thumbs).
With the right tools and a bit of elbow grease, you’ll be flipping burgers on a grill so clean it practically sparkles.
Get ready to impress everyone with your spotless, smoky masterpiece! Using the best tools and materials ensures your BBQ grill stays in top condition, making every cookout a delicious success.