How to Grill Without a Grill Using Step-by-Step Methods
You can grill without a traditional grill by using cast iron skillets or stovetop grill pans—preheat them well, add a bit of oil, and cook your food like you would on a grill.
These methods allow you to enjoy authentic grilled flavors indoors or anywhere, even without a conventional grill.
Build a simple grill pit with cinderblocks and a metal grate outdoors, or try oven broiling on a preheated cast iron pan.
Both options provide great alternatives to traditional grilling and bring out delicious smoky tastes.
Air fryers also give a crispy, grilled effect fast.
Keep experimenting, and you’ll uncover many easy ways to enjoy grilled flavors anywhere.
This ensures you never miss out on your favorite grilled meals, no matter your setup.
Key Takeaways
- Build a DIY grill pit with cinderblocks arranged securely and place a metal grate or flat rocks on top for grilling.
- Use a cast iron skillet or grill pan preheated over medium-high heat for indoor grilling of meats and vegetables.
- Set your oven to broil at 500°F with a cast iron pan inside for searing and grilling indoors.
- Employ an air fryer preheated to 400°F for quick, crispy grilling of meats like shrimp and chicken.
- Create a makeshift grill by placing a metal cooling rack over a fire pit or stacking cinderblocks with a grate.
Building a DIY Grill Pit With Cinderblocks
Building a DIY grill pit with cinderblocks is a simple way to create a sturdy cooking surface without a traditional grill. To start, arrange cinderblocks in a rectangular or square shape, leaving a central opening for the fire pit where you’ll place hot coals or embers. Make sure the blocks are dry before stacking to avoid cracking or explosions caused by trapped moisture.
The interior should be slightly narrower than your grill grate, ensuring it sits securely on top. For the cooking surface, lay flat rocks or a metal grate across the top of the cinderblocks, which helps distribute heat evenly. Always prioritize safety by stacking blocks securely to prevent tipping and keeping the area free from flammable materials.
With this DIY grill pit, you’ll have a reliable and simple setup for outdoor cooking without needing a traditional grill.
Using a Cast Iron Skillet for Indoor Grilling
To get that perfect sear and grill marks, you’ll want to preheat your cast iron skillet over medium-high heat for about 5 to 10 minutes. Make sure not to overcrowd the pan so your food cooks evenly and browns nicely.
Keep an eye on cooking times, like 6 to 7 minutes per side for chicken breasts, to lock in juices and flavor.
Preheating Cast Iron
A well-preheated cast iron skillet is key to indoor grilling success. Start by making sure your skillet is dry and lightly oiled to prevent sticking and improve grilling. Then, place it on medium-high heat for 5 to 10 minutes.
Preheating cast iron properly allows the skillet to reach around 400°F, the ideal temperature for grilling. Using a thermometer helps you gauge when the pan is ready. A well-seasoned skillet retains and distributes heat evenly, giving your meats and veggies a great sear and flavor.
Once preheated, add your ingredients carefully, avoiding overcrowding to keep the temperature consistent and guarantee perfect cooking. Mastering preheating cast iron sets the stage for delicious indoor grilling without a grill.
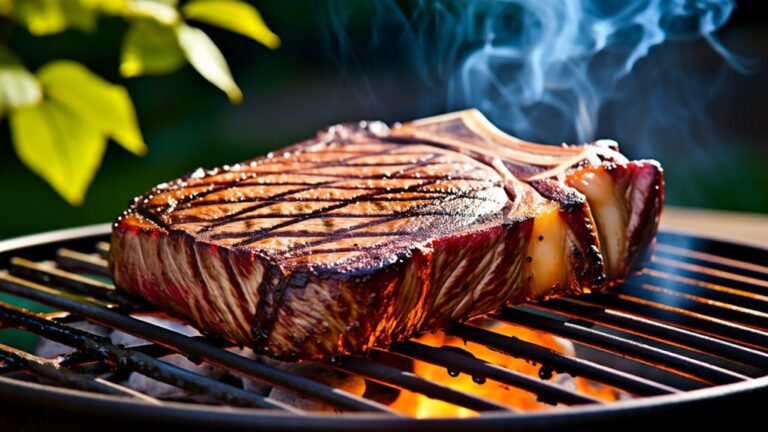
Achieving Grill Marks
Grill marks aren’t just for looks—they signal a perfect sear and deep flavor. To achieve them using a cast iron skillet, start by preheating it over medium-high heat for 5-10 minutes until it’s hot enough. Lightly oil the skillet with a high smoke point oil like canola or avocado to prevent sticking.
Place your steak or vegetables diagonally on the skillet and press down gently to guarantee good contact. Resist the urge to move the food; letting it cook undisturbed allows the Maillard reaction to create those distinctive grill marks and a flavorful crust. Once the marks form, flip the food and continue cooking until it reaches your preferred doneness.
This method guarantees beautiful grill marks without an outdoor grill.
Cooking Times Guide
Mastering cooking times is key when using a cast iron skillet for indoor grilling, as it guarantees your food cooks evenly and reaches the perfect doneness. For shrimp, grill them for 4-5 minutes, stirring occasionally to confirm even cooking.
Chicken breasts need about 6-7 minutes per side in your preheated grill pan for a great sear, while chicken thighs require 5-7 minutes per side to stay juicy and fully cooked. Pork chops take 4-6 minutes per side—keep an eye on them to hit the right doneness.
If you’re grilling Beyond burgers, 3-5 minutes per side is enough to get them heated through with a nice crust. Following these times helps you make the most of your grill pan indoors.
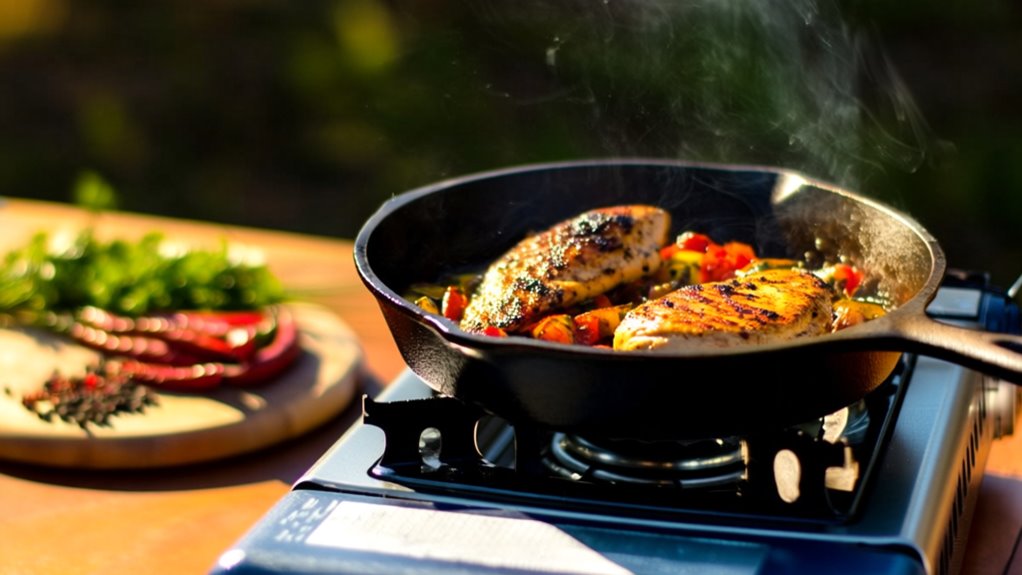
Grilling on a Stovetop Grill Pan
Although you won’t have the open flames of an outdoor grill, using a stovetop grill pan can still give you those coveted sear marks and a deliciously grilled flavor. Start by preheating your cast iron or nonstick grill pan over medium-high heat for about 5 minutes to guarantee even cooking and perfect grill marks. Lightly brush the pan with a high smoke point oil like canola or grapeseed to prevent sticking and boost flavor.
When grilling meats, cook chicken breasts for 6-7 minutes per side and pork chops for 4-6 minutes, flipping only once to get the best sear. For vegetables, cut them into medium-sized pieces and grill for 4-6 minutes, turning occasionally for even cooking and char marks. Since stovetop grilling lacks natural smoke, adding a bit of liquid smoke to your marinade can help replicate that smoky taste you love.
Grill pans truly make indoor grilling easy and tasty.
Oven Grilling Techniques for Home Cooks
If you enjoyed the convenience of stovetop grilling but want to get closer to that outdoor flame effect, your oven can be a powerful tool. To master oven grilling techniques, start by preheating your oven to 500°F with a cast iron grill pan inside for at least 30 minutes. This creates a high-temperature surface that mimics outdoor grilling.
Use the broil setting and place the pan on the top rack to get your food close to the heating element, perfect for searing meats and achieving grill marks. Remember to turn your food halfway through cooking to guarantee even grilling and prevent overcooking. For added flavor, marinate your meats or add liquid smoke to replicate that smoky taste.
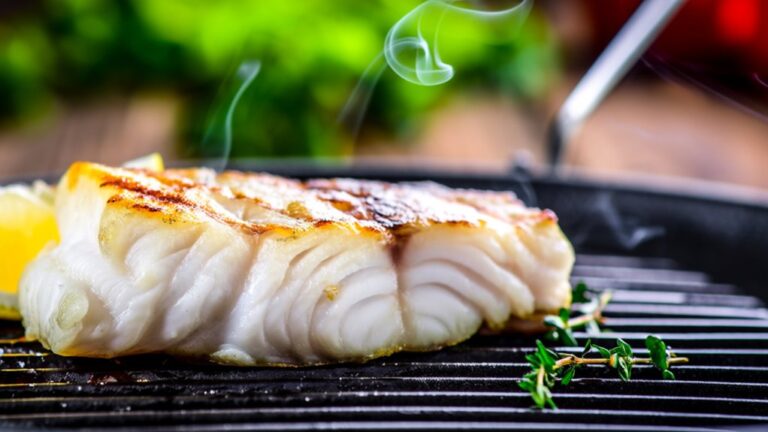
When grilling vegetables or fish, wrap them in foil packets and roast at 450°F until tender, locking in moisture and flavor. These oven grilling techniques will help you enjoy grilled dishes year-round without stepping outside.
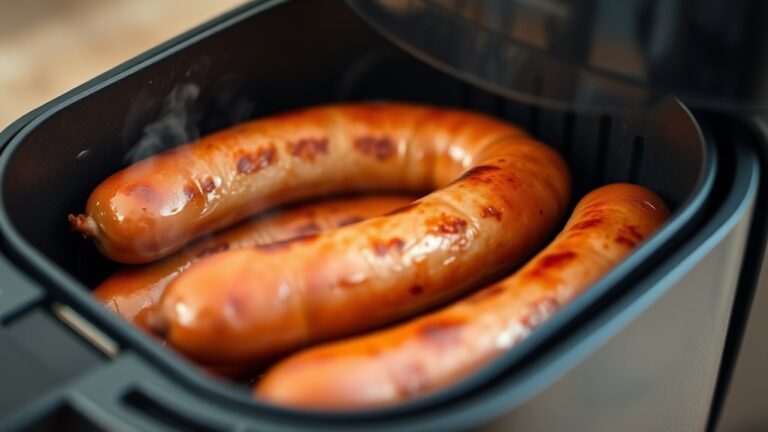
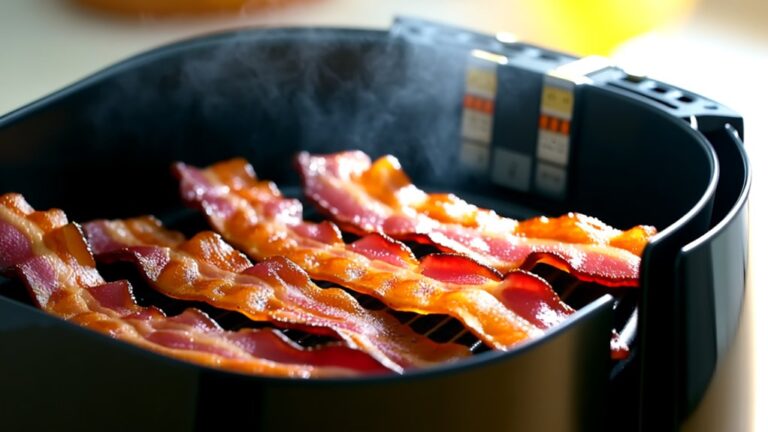
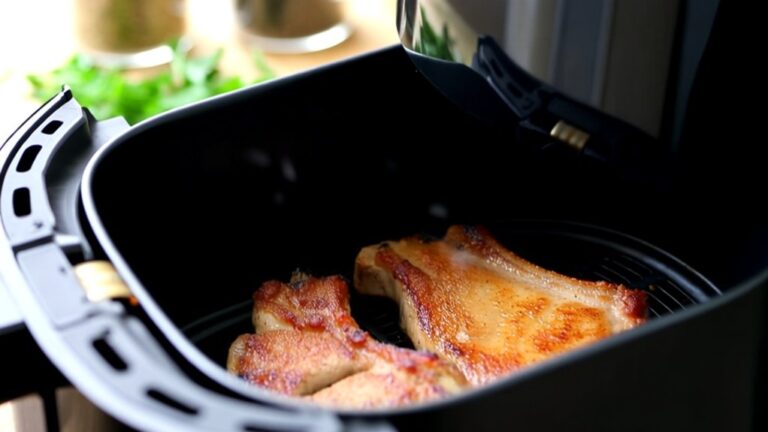
Air Fryer Grilling: A Modern Alternative
How does an air fryer deliver that satisfying grilled texture without a traditional grill? Air fryer grilling works by circulating hot air rapidly around your food, creating a crispy, seared exterior similar to outdoor grilling, but without charcoal or an open flame. To nail this modern alternative, preheat your air fryer to about 400°F for the best results.
You’ll enjoy shorter cooking times—shrimp takes just 4-5 minutes, while chicken breast needs around 12-15 minutes depending on thickness.
To make the most of air fryer grilling, keep these tips in mind:
- Marinate proteins beforehand to boost flavor
- Use minimal oil for healthier meals
- Season generously with grilling spices
Experiment with steak, chicken, and vegetables for variety.
With these steps, you can easily replicate grilled favorites indoors, enjoying a quick, convenient, and tasty cooking experience anytime.
Cooking Over a Campfire: Ember Techniques
When cooking over a campfire, you’ll want to focus on creating steady embers by letting your fire burn down or building a key fire for even heat. Using skewers makes it easy to cook meats while rotating them evenly over the coals.
Plus, cast iron cookware is perfect here because it holds heat well and helps you cook your food consistently.
Ember Creation Methods
Although you might be enthusiastic to start cooking, it’s important to let your fire burn down until the logs turn into glowing embers, as they provide the steady, even heat necessary for great campfire cooking. Ember creation methods focus on producing these hot coals for consistent heat.
You can:
- Build a teepee fire and wait for the flames to subside, leaving glowing logs.
- Construct a key fire to enhance airflow and speed up ember formation.
- Scrape embers into a flat, even bed to guarantee uniform cooking temperatures.
- Use a sharp stick or skewer to hold food above the embers safely.
Skewer Cooking Tips
Since cooking over embers provides steady, even heat, skewering your food with a sharp stick lets you easily manage and cook it thoroughly without burning. When you’re outdoors, use a Y-shaped stick or set stable stones to hold your skewers above the embers, ensuring they don’t roll or fall. This setup mimics the control you have grilling indoors with a frying pan or cast iron cookware.
Cast Iron Advantages
Cast iron skillets bring a reliable, even heat that’s perfect for cooking over campfire embers. Using cast iron cookware lets you enjoy consistent temperature control, preventing food from burning while delivering rich, smoky flavors. When cooking over embers, you’ll appreciate how durable and heat-retentive cast iron is, making your campfire meals truly satisfying.
To optimize your experience, consider these tips:
- Let a teepee fire burn down to create perfect embers for cooking
- Use dry flat rocks as griddles, but make sure they’re fully dried to avoid cracking
- Skewers made from sharp sticks help manage meats over the heat
- Cast iron cookware evenly distributes heat and withstands rugged outdoor use
With cast iron, you get unmatched versatility and flavor when cooking without a grill.
Creating Makeshift Grills With Household Items
When you don’t have a traditional grill, you can easily create a makeshift one using common household items. For example, place a metal cooling rack or baking rack over a fire pit or campfire for even heat and good ventilation. You can also stack cinderblocks to form a stable grill structure and lay a metal grate on top.
If you’re feeling creative, invert a terracotta flower pot—put charcoal or embers inside and place your food on top. Another option is repurposing an old metal trash can or bucket by cutting out the bottom, adding charcoal, and placing a grill grate over it. Using bricks to form a rectangular pit lined with foil or a metal grate also works well.
These makeshift grill setups let you enjoy grilled meals without traditional equipment and adapt easily to your available space and materials.
Adapting Meat Recipes for Indoor Cooking
Although indoor cooking lacks the open flame of traditional grilling, you can still achieve delicious, well-seared meats by using the right techniques and equipment. To grill without a grill, focus on preheating your pan or skillet to lock in flavors and create those classic grill marks.
Indoor cooking lacks flames but with preheated pans, you can achieve flavorful, well-seared meats and classic grill marks.
Adapting meat recipes for indoor cooking means tailoring your timing and tools for the best results.
Here’s how to master indoor grilling:
- Cook chicken breasts in a preheated grill pan for 6-7 minutes per side to keep them juicy with a nice sear.
- Sauté shrimp for 4-5 minutes with occasional stirring to maintain tenderness.
- Use a cast iron skillet for pork, grilling 4-6 minutes per side to form a perfect crust.
- Grill Beyond Burgers in a nonstick pan for 3-5 minutes per side for a satisfying bite.
With these tips, you can confidently grill without a grill and enjoy flavorful meats indoors. Remember to monitor the internal temperature closely using a meat thermometer to ensure perfect doneness and food safety.
Preparing Fruits and Vegetables Without a Grill
You can easily bring out smoky, grilled flavors in fruits and vegetables by sautéing them in a hot cast iron skillet with your favorite herbs and spices. Wrapping veggies in foil packets and roasting them at high heat locks in moisture and intensifies their taste.
For corn, a quick boil before seasoning helps it absorb flavors better and shortens cooking time.
Sautéing for Grilled Flavor
Since grilling isn’t always an option, sautéing offers a quick way to achieve those smoky, charred flavors with fruits and vegetables. To get started, dice your produce evenly for consistent cooking and better flavor absorption.
Preheat a nonstick pan over medium-high heat, adding just enough oil to prevent sticking and encourage browning. Sauté your veggies—like bell peppers, zucchini, or asparagus—for 5-7 minutes, stirring occasionally to mimic grilled textures.
Enhance those grill flavors by tossing in herbs, spices, or a splash of citrus juice during cooking. Imagine this:
- Vibrant bell peppers sizzling and softening
- Zucchini developing golden edges
- Asparagus tips crisping slightly
- Citrus brightening smoky undertones
With sautéing, you can enjoy grilled tastes anytime, right on your stovetop.
Oven Foil Packet Cooking
When you’re craving that grilled taste but don’t have access to an outdoor grill, oven foil packet cooking offers a simple and effective alternative. Preheat your oven to 450°F, then cut fruits and vegetables into medium dice to guarantee they cook evenly while keeping some texture. Season them with your favorite herbs, spices, and a drizzle of oil, adding a splash of citrus or vinegar for brightness.
For a smoky twist, a few drops of liquid smoke inside the foil packet can mimic outdoor grilling flavors. Seal the packets tightly to trap steam, then bake for 15-20 minutes, checking for tenderness. This method locks in moisture and infuses flavors, making oven foil packet cooking a convenient way to enjoy grilled-style fruits and vegetables without a grill.
Boiling and Seasoning Corn
Oven foil packet cooking brings out great flavors in fruits and vegetables, but corn on the cob calls for a different approach to get that tender, sweet bite. Start by soaking the corn in water for 30 minutes to lock in moisture. Then, boil it in salted water for 2-3 minutes to enhance its natural sweetness and speed up cooking.
Once boiled, you can add even more flavor by grilling it briefly in the oven or on the stovetop.
To perfect your boiling and seasoning corn technique, remember to:
- Soak corn to prevent dryness
- Boil in salted water for quick, flavorful cooking
- Season with butter, salt, or herbs after boiling
- Optional: grill briefly for a smoky touch
This way, you’ll enjoy delicious corn without a grill.
Enhancing Flavor When Grilling Indoors
Although you’re grilling indoors, you can still capture that smoky, rich flavor by using marinades with liquid smoke or smoky spices. These add the signature flavors of the grill to your meats and vegetables, making your indoor grilling experience just as satisfying. Before cooking, make sure to preheat your cast iron grill pan or skillet thoroughly to achieve those perfect sear marks and deepen the flavor profile.
When sautéing vegetables, toss in fresh herbs and spices to mimic the complexity of outdoor grilling. For corn on the cob, boiling it in salted water enhances its natural sweetness, and finishing it on the grill pan adds a subtle grilled taste. Don’t hesitate to brighten your dishes with a splash of citrus or vinegar; these ingredients balance richness and elevate the overall flavor.
Frequently Asked Questions
How to Grill Without Having a Grill?
You can grill without a grill by using a cast iron grill pan on your stovetop or in the oven. Just preheat the pan well to get those nice sear marks and smoky flavor. An air fryer also works great for grilling indoors.
Don’t forget to marinate your food or add liquid smoke to mimic that grilled taste. For veggies or fruits, cut them evenly and consider foil packets to keep them juicy.
What Can I Use if I Don’t Have a Grill?
If you don’t have a grill, grab a grill pan or get grilling in your oven! You can use a cast iron grill pan for perfect sear marks and fat drainage right on your stovetop.
Or crank up your oven’s broiler to mimic that smoky char. Air fryers and foil packets also offer fantastic, fuss-free alternatives to grilling outdoors.
You’ve got plenty of practical, portable options to prepare your favorite foods!
How to Mimic a Grill?
To mimic a grill, you can use a cast iron skillet or grill pan on your stovetop, heating it until it’s really hot to get those nice sear marks. Adding liquid smoke or smoky marinades boosts that grilled flavor.
You could also try an air fryer for crispy edges or cook veggies in foil packets in the oven to lock in moisture. These tricks help you enjoy that grilled taste without an actual grill.
How to Get the Effects of Grilling Without Using a Grill?
Think of your kitchen as a canvas where you can paint smoky, charred flavors without a grill. You’ll want to preheat a cast iron skillet or grill pan until it’s scorching hot to get that perfect sear.
Add smoky marinades or a dash of liquid smoke to mimic outdoor grilling. Using your oven’s broiler can also create those delicious charred edges.
With these tricks, you’ll capture grilling’s essence right at home.
Conclusion
Grilling without a grill might sound like a challenge, but with a little creativity, it’s as easy as pie. Whether you’re building a cinderblock pit, using a cast iron skillet, or trying your air fryer, you’ve got plenty of ways to bring that smoky flavor indoors.
Remember, the sizzle of your food is the heartbeat of any great meal—so don’t let the lack of a grill stop your culinary rhythm!
By exploring these step-by-step methods to grill without a grill, you can enjoy delicious, smoky dishes anytime. Embrace these alternatives and master the art of grilling without a grill for flavorful results every time.