How to Roast Garlic in an Air Fryer in 10 Easy Steps
To roast garlic in your air fryer, start by slicing off the top of a garlic head and drizzling olive oil over the exposed cloves. This easy garlic roasting method enhances flavor and saves time.
Sprinkle with salt, then wrap the garlic tightly in foil.
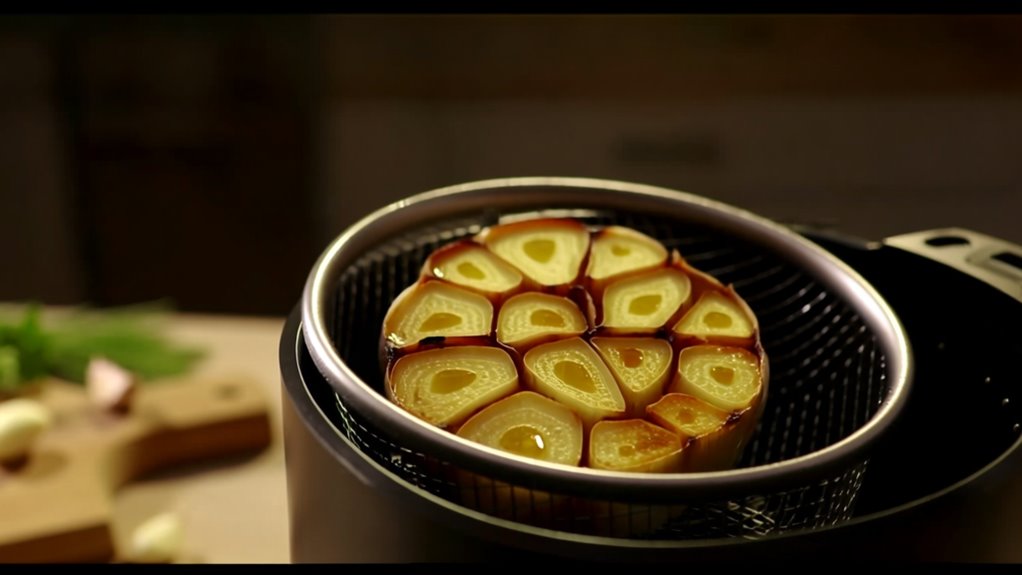
Preheat your air fryer to 380°F, place the foil pouch inside, and cook for about 16-20 minutes until soft and caramelized. The air fryer ensures even roasting and a deliciously tender texture.
Let it cool briefly before unwrapping and using.
Keep following for tips on seasoning, storage, and how to get the best flavor from your roasted garlic. This simple technique is perfect for adding rich taste to many dishes.
Enjoy the convenience and delicious results of air fryer roasted garlic!
Key Takeaways
- Slice off the top 1/4 inch of a firm garlic head to expose cloves and drizzle with 1/2 tablespoon olive oil and a pinch of salt.
- Wrap the garlic tightly in aluminum foil to create a sealed pouch for moisture retention during roasting.
- Preheat the air fryer to 380°F (190°C) for 3 to 5 minutes for even cooking and optimal results.
- Place the foil-wrapped garlic in the air fryer basket and roast at 380°F for 16 to 20 minutes until soft and caramelized.
- Let the garlic cool for 10 minutes after roasting, then unwrap carefully and squeeze out the soft cloves to use or store.
Gather Your Ingredients and Equipment
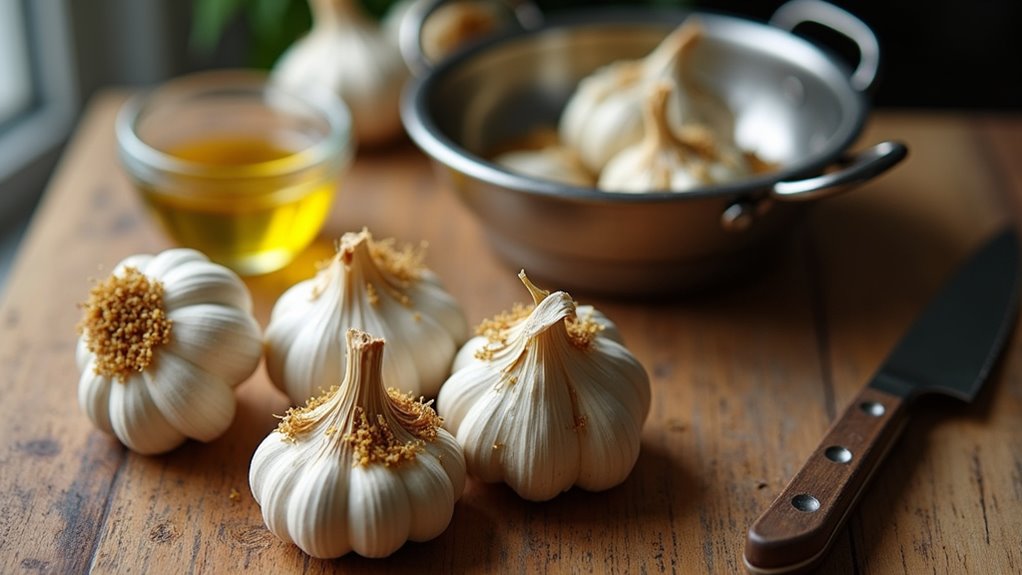
To roast garlic in your air fryer, you’ll need just a few basic items: a head of garlic, some aluminum foil, a bit of extra-virgin olive oil, plus salt and pepper for seasoning.
Before you start, make sure your air fryer is clean and preheated to between 380-400°F (190-200°C) for perfect roasting. You’ll also want a sharp knife handy to cut the garlic head, exposing the cloves.
Aluminum foil is essential to create a pouch that locks in moisture during cooking, keeping your garlic tender and flavorful. Using extra virgin olive oil will enhance the garlic’s natural sweetness, while a pinch of salt and pepper adds just the right seasoning.
With these ingredients and tools ready, you’re all set for roasting garlic easily in your air fryer.
Prepare the Garlic Head
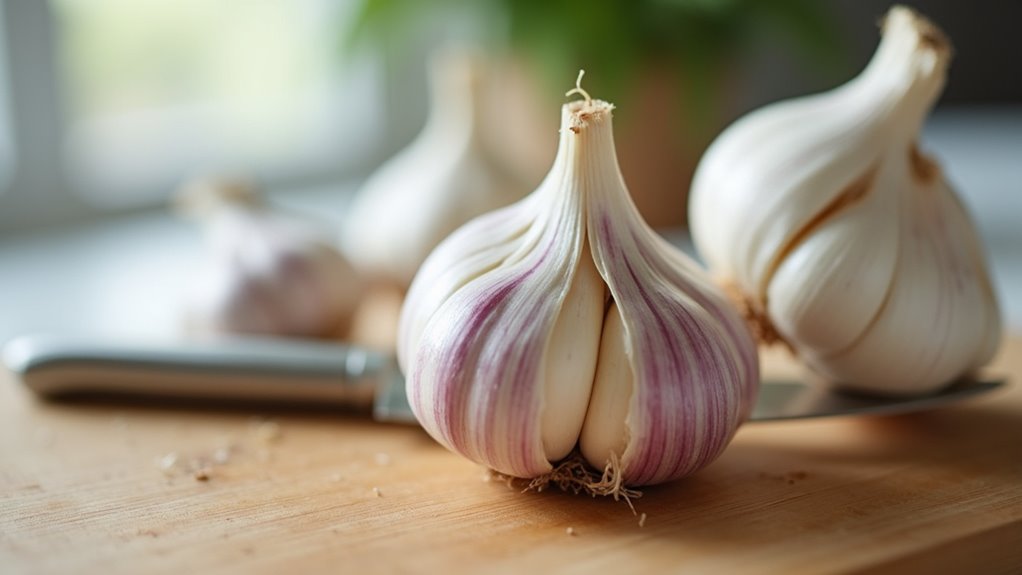
Although any variety of garlic will work, make certain you pick a firm head without blemishes for the best roasting results. To prepare the garlic head, start by slicing off the top 1/4 inch to expose the cloves. This step guarantees even roasting and maximizes flavor.
Next, place the garlic head on a square piece of aluminum foil. Drizzle about 1/2 tablespoon of extra virgin olive oil over the exposed cloves to keep them moist and flavorful as they roast. If you like, you can sprinkle a pinch of salt on top for a subtle seasoning boost.
Finally, wrap the garlic tightly in the foil to create a sealed pouch. This will help the garlic roast evenly in your air fryer.
Season the Garlic
To get the best flavor, start by choosing the right seasoning for your garlic. Make sure to drizzle oil evenly over the cloves to keep them moist and tasty.
Don’t forget to balance salt and pepper to enhance the natural garlic taste perfectly.
Choosing the Right Seasoning
Seasoning your garlic before roasting is key to revealing its full flavor potential. Start by drizzling extra-virgin olive oil over the garlic cloves; this not only enriches the taste but also helps them caramelize beautifully. Next, season with salt and ground black pepper to create a balanced flavor profile.
To elevate the aroma and complexity, sprinkle herbs like thyme, rosemary, or basil according to your preference. If you want to add a bit of heat or smokiness, try incorporating paprika or chili flakes. Remember, the choice of seasoning depends on how you plan to use your roasted garlic cloves—whether in spreads, sauces, or dishes.
Tailor the spices and herbs to complement your recipe, ensuring every bite bursts with perfectly enhanced flavor.
Applying Oil Evenly
One key step in preparing your garlic for roasting is applying about half a tablespoon of extra-virgin olive oil evenly over the exposed cloves. You’ll want to use a brush or your fingers to apply oil evenly, making certain every surface of the exposed cloves is coated. This helps the garlic roast evenly and develop that rich, caramelized flavor.
When you season the garlic, you can add a pinch of salt and pepper along with the oil to enhance taste. For extra aroma, consider mixing in herbs like thyme or rosemary. After applying oil and seasoning, wrap the garlic tightly in aluminum foil.
This traps moisture and guarantees your roast garlic cooks perfectly in the air fryer.
Balancing Salt and Pepper
After you’ve coated the garlic with oil and wrapped it up, it’s time to think about seasoning with salt and pepper. For perfect air fryer roasted garlic, use ¼ teaspoon each of salt and ground black pepper per head. Salt draws out moisture, intensifying the garlic flavor, while pepper adds subtle warmth without overpowering the roasted cloves.
This simple step will enhance flavor and keep your recipe easy to make. You can adjust amounts based on your taste or add herbs like thyme for an aromatic twist.
| Ingredient | Amount per Head | Effect on Flavor |
|---|---|---|
| Salt | ¼ teaspoon | Draws moisture, sweetens |
| Ground Black Pepper | ¼ teaspoon | Adds warmth, complements |
| Optional Herbs | To taste | Adds aroma, complexity |
Wrap Garlic in Foil
Before wrapping the garlic, cut off the top to expose the cloves, which helps the heat penetrate evenly. Take a head of garlic and place it in the center of a square piece of aluminum foil. Drizzle about 1/2 tablespoon of olive oil on top to keep it moist and add flavor.
For an enhanced roasted garlic recipe, you can also season with a pinch of salt and pepper. Now, carefully wrap garlic in foil, folding it tightly to create a sealed pouch. This step is vital for air frying, as it retains moisture and prevents steam from escaping.
Make certain the foil is securely wrapped to guarantee your garlic roasts evenly and turns out perfectly soft and caramelized.
Preheat the Air Fryer
Setting your air fryer to 380°F (190°C) and letting it preheat for 3 to 5 minutes guarantees your garlic roasts evenly and develops the perfect texture. Preheating the air fryer guarantees even cooking and ideal roasting by bringing the air fryer temperature to the ideal level before you add the garlic.
Skipping this step can cause uneven cooking and longer cooking times. Always check your air fryer manual for model-specific preheating instructions, as times may vary. Preheating also helps to reduce overall cooking time and achieve a crispy texture.
| Step | Importance | Result |
|---|---|---|
| Preheat 3-5 mins | Guarantees even heat | Consistent garlic texture |
| Set temp 380°F | Ideal roasting | Perfect caramelization |
| Follow manual | Model-specific tips | Avoids over/under cooking |
| Skip preheat | Not recommended | Uneven cooking & longer times |
Place Garlic in the Air Fryer Basket
First, cut the top off the garlic head to expose the cloves, then wrap it tightly in aluminum foil to keep it moist. Place the foil-wrapped garlic in the air fryer basket below the maximum fill line to guarantee proper air circulation.
This setup helps the garlic roast evenly and become perfectly soft.
Preparing Garlic for Roasting
To prepare your garlic for roasting, start by slicing off the top quarter inch of the garlic head to reveal the exposed cloves. This step is essential as it allows the heat from the air fryer to penetrate and roast the garlic evenly.
Next, drizzle about half a tablespoon of olive oil over the exposed cloves; the oil helps enhance flavor and keeps the garlic moist during cooking. Once you’ve done this, you’ll want to wrap the garlic head tightly, but we’ll cover that in the next section.
For now, make sure the garlic head is ready to be placed in the air fryer basket. Position it carefully so it doesn’t exceed the basket’s maximum fill line, ensuring safe and effective roasting.
Wrapping Garlic in Foil
Once you’ve prepped the garlic, wrap it tightly in aluminum foil to retain moisture and flavor. First, cut the top off to expose the cloves, then drizzle with olive oil and season with salt and pepper.
Next, wrap tightly in aluminum foil, sealing all edges to create a pouch. Place the foil-wrapped garlic in the air fryer basket and air fry at 380°F for 16 to 20 minutes until soft and caramelized.
This method guarantees perfectly roasted garlic every time.
| Step | Action | Purpose |
|---|---|---|
| 1 | Expose the cloves | Allows oil to penetrate |
| 2 | Drizzle with olive oil | Enhances flavor & moisture |
| 3 | Wrap tightly in aluminum foil | Retains moisture |
| 4 | Place in air fryer basket | Even cooking |
| 5 | Air fry at 380°F | Achieves soft, caramelized cloves |
Proper Air Fryer Placement
After wrapping your garlic securely in foil, placing it correctly in the air fryer basket makes all the difference in achieving even roasting. Position the garlic with the cut side facing up to enhance flavor extraction and guarantee uniform cooking. Use a square piece of aluminum foil to create a pouch that holds the garlic snugly, preventing any oil from leaking during roasting.
Place the wrapped garlic directly in the air fryer basket, making sure it doesn’t exceed the maximum fill line to maintain ideal air circulation. If you’re roasting multiple heads, leave space between them to avoid overcrowding. Keep an eye on the cooking time, as different air fryer models may require slight adjustments in placement for the best results.
Set the Cooking Temperature and Time
You’ll want to preheat your air fryer to 380°F (190°C) for the best roasting results. This temperature provides ideal roasting conditions, ensuring your garlic becomes fully soft and caramelized. The cooking time typically ranges from 16 to 20 minutes, but if you have larger heads of garlic, you might need to extend it to 25-30 minutes.
Since air fryer models vary, you’ll need an air fryer that allows you to monitor the garlic closely to reach your desired level of softness.
| Garlic Size | Temperature | Cooking Time |
|---|---|---|
| Small to Medium | 380°F (190°C) | 16-20 minutes |
| Large | 380°F (190°C) | 25-30 minutes |
| Check Early | N/A | After 16 minutes |
Monitor Garlic for Doneness
After about 16 minutes, start checking your garlic for softness by carefully unwrapping the foil and pressing on the cloves.
If it’s not soft enough, just pop it back in the air fryer and add a few more minutes. Keep an eye on it since cooking times can vary depending on your air fryer and the size of the garlic head.
Check Softness Regularly
Anyone roasting garlic in an air fryer should check its softness regularly, starting about 15 minutes into cooking. Cooking times vary by model and garlic size, so gently pierce the cloves to see if they’re soft.
If not, carefully open the foil pouch—watch out for hot steam—and continue roasting in 2-3 minute increments until the cloves are exposed and tender. Let the garlic cool before handling.
Here’s a quick guide:
| Softness Level | Action Needed |
|---|---|
| Firm | Continue roasting |
| Slightly soft | Check again in 2 mins |
| Soft & tender | Ready to use |
Checking softness regularly guarantees perfectly air fryer roasted garlic every time.
Adjust Time as Needed
Two key factors influence how long garlic takes to roast in your air fryer: the size of the garlic head and your specific model. Because cooking times vary, you’ll want to monitor the garlic closely for doneness. Start checking around 16 minutes—roasted garlic is done when it’s soft and easily squeezable.
If it’s not tender yet, adjust time by adding 2-3 minute increments. Remember, smaller heads cook faster, while larger ones might need the full 20 minutes or a bit more. When opening the foil pouch, be cautious of hot steam to avoid burns.
To summarize:
- Begin checking doneness at 16 minutes
- Add 2-3 minutes if garlic isn’t soft
- Handle foil carefully to avoid hot steam
Adjusting time guarantees perfectly roasted garlic every time.
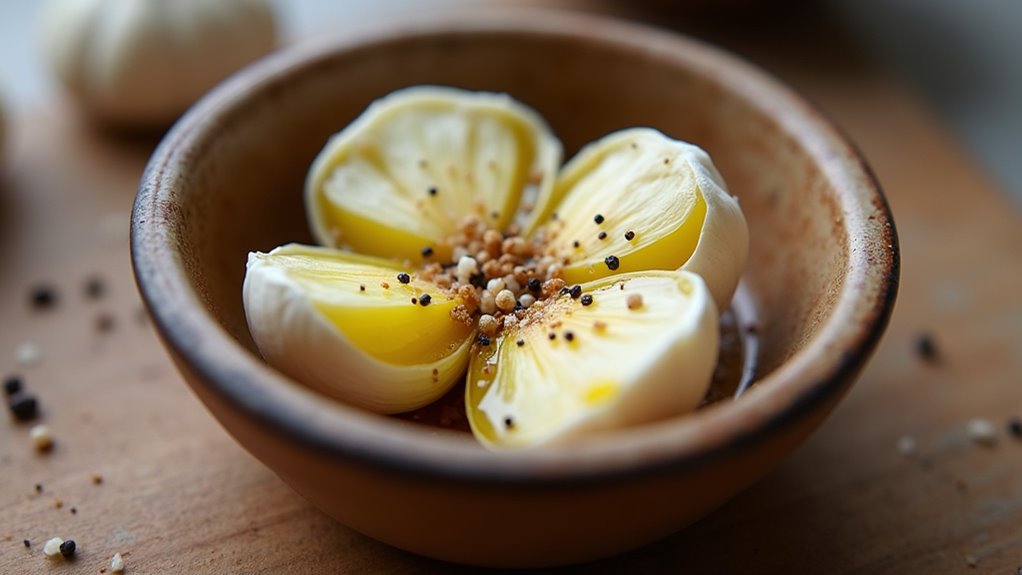
Cool and Unwrap the Garlic
Once you’ve finished air frying, carefully remove the foil pouch with oven mitts or tongs to avoid burns from hot steam. Let the garlic cool for about 10 minutes before unwrapping the foil. When you unwrap it, be cautious of any remaining hot steam.
To get the roasted garlic cloves, gently squeeze the base of the garlic head—the softened cloves will slide right out. If you’re not using the garlic right away, store it in an airtight container to keep it fresh.
| Step | Action | Tip |
|---|---|---|
| Cool | Let foil-wrapped garlic rest for 10 minutes | Avoid burns and ease handling |
| Unwrap | Carefully open the foil pouch | Watch for escaping steam |
| Extract Cloves | Squeeze garlic base to release cloves | Use immediately or store airtight |
Use or Store Roasted Garlic
After you’ve extracted the roasted garlic cloves, you can use them right away or store them to enjoy later. You can use roasted garlic in spreads, sauces, or mashed potatoes to add rich flavor. If you’re not using it immediately, store in the refrigerator in an airtight container for up to 5 days.
For longer storage, prepare garlic confit by covering the mashed garlic with olive oil in a glass jar, lasting about 2 weeks. You can also freeze roasted garlic, ideally mashed garlic, in ice cube trays or silicone bags to prevent clumping and make portioning easy. Frozen garlic keeps its flavor for up to 6 months.
- Store in the refrigerator in an airtight container for up to 5 days
- Make garlic confit with olive oil for up to 2 weeks
- Freeze roasted, mashed garlic for up to 6 months for easy use
Frequently Asked Questions
How Do You Roast Garlic in an Air Fryer?
You roast garlic in an air fryer by cutting the top off a garlic head, drizzling it with olive oil, and seasoning with salt and pepper. Wrap it tightly in foil to keep the steam in.
Preheat your air fryer to 380°F and cook the wrapped garlic for about 16-20 minutes until soft. Carefully open the foil, let it cool, then squeeze out the roasted cloves for a delicious, easy addition to your meals.
How Long Does Garlic Take in the Air Fryer?
Garlic usually takes about 16 to 20 minutes in the air fryer at 380°F (190°C). The exact time depends on the size of the garlic head and your air fryer model. You’ll want to check it around 15 minutes to avoid overcooking.
Wrapping the garlic in foil helps keep it moist and soft. After roasting, let it cool before unwrapping so you don’t get burned by the steam.
What Is the Quickest Way to Roast Garlic?
Imagine golden, caramelized garlic cloves bursting with sweet, mellow flavor in under 20 minutes—that’s the quickest way to roast garlic. You’ll just trim the top, drizzle olive oil, season, and wrap it tightly.
Then, pop it in your air fryer at 380°F. This method slashes roasting time compared to the oven, delivering soft, fragrant garlic faster, perfect for busy nights when you want rich flavor without the wait.
How to Roast Garlic in an Air Fryer Without Oil?
To roast garlic in your air fryer without oil, start by slicing the top off the bulb to expose the cloves. Wrap it tightly in aluminum foil to trap moisture and keep it from drying out.
Set your air fryer to 400°F and cook the wrapped garlic for 20-25 minutes. Once done, let it cool a bit before unwrapping and squeezing out the soft, caramelized cloves for a delicious, oil-free flavor boost.
Conclusion
Now that you’ve mastered the magic of roasting garlic in your air fryer, you’re set to savor its sweet, smoky softness. With simple steps and speedy settings, you can swiftly whip up wonderfully warm, well-seasoned garlic to boost any bite.
Whether you’re blending it into butter or brightening a broth, this easy, efficient method makes your meals more memorable. So go ahead, gather, grill, and garnish with garlic goodness anytime!
By following these easy steps to roast garlic in an air fryer, you’ll enjoy perfectly roasted garlic that enhances your dishes with rich flavor. Embrace the convenience and deliciousness of air fryer roasted garlic today!