How Long to Grill Chicken Drummies Step by Step
You’ll grill chicken drummies for about 30-35 minutes to achieve tender, juicy meat and crispy skin.
Start with a 5-7 minute sear over direct heat to crisp the skin and lock in flavor. This initial high heat step is essential for perfect grilling.
Then move them to indirect heat, cooking at 275°F-325°F. Turn the drummies every 5 minutes to ensure even cooking throughout.
Brush on sauces during the last 5 minutes to build rich flavor and caramelization. Always check they hit an internal temperature of 165°F for safe eating.
Finally, let the chicken drummies rest for five minutes before serving to keep juices locked in.
Keep going to discover tips for perfect crispiness and flavor.
Key Takeaways
- Preheat grill to 400°F-450°F and clean grates to ensure even cooking and prevent sticking.
- Sear chicken drumsticks over direct heat for 5-7 minutes per side to develop a crispy exterior.
- Move drumsticks to indirect heat and grill for 20-25 minutes, turning every 5 minutes for even cooking.
- Check internal temperature with a meat thermometer, ensuring it reaches 165°F for safe consumption.
- Apply BBQ sauce during the last 5-10 minutes of grilling, then let drumsticks rest for 5 minutes before serving.
Choosing the Right Chicken Drumsticks
When picking chicken drumsticks for grilling, it’s best to choose ones that are similar in size, around 4-5 ounces each, so they cook evenly. This helps prevent some pieces from drying out while others remain undercooked. Opt for chicken drumsticks with skin-on; the skin locks in juiciness and adds flavor during grilling, enhancing your overall grilling experience.
Freshness is key—look for drumsticks with a pinkish hue and no off odors. Avoid any that seem slimy or discolored. If you can, choose organic or free-range options, as they tend to have richer flavor and better fat content, which contributes to succulent results.
Always check the packaging for the sell-by date to guarantee maximum freshness. By carefully selecting quality chicken drumsticks, you set the foundation for an even cooking process and a delicious, juicy outcome every time you grill.
Preparing the Chicken for Grilling
Before you start grilling, make sure to pat your chicken drumsticks dry and trim any excess skin for even cooking. Next, season them well with your favorite spice rub or marinade to boost flavor. Letting the drumsticks rest at room temperature helps everything cook evenly on the grill.
Cleaning and Trimming
Although it might seem simple, properly cleaning and trimming your chicken drumsticks is crucial for great grilling results. Start by rinsing the drumsticks under cold water to remove surface contaminants, but avoid over-rinsing to prevent spreading bacteria. Next, trim any excess skin or loose pieces to promote even cooking and help seasoning stick better.
Make certain all drumsticks are of similar size to guarantee they cook uniformly on the grill, preventing some from being undercooked or overcooked. Pat the chicken drumsticks dry with paper towels; this step enhances crispiness and helps spices absorb better. Once cleaned and trimmed, you can season or marinate them to enhance flavor before grilling.
Proper cleaning and trimming set the foundation for juicy, flavorful chicken every time.
Seasoning and Marinating
Since you’ve already dried and trimmed your chicken drumsticks, seasoning or marinating them properly is key to boosting flavor and ensuring a crispy, delicious result. Start by applying a simple dry rub with salt and pepper, garlic powder, and optional cayenne for heat. Lightly brush the drumsticks with oil to help the seasoning stick and prevent sticking once you oil the grill.
For even more flavor and tender meat, consider marinating your chicken in a mixture of BBQ sauce and spices for at least 30 minutes or up to overnight. Let your seasoned or marinated drumsticks rest at room temperature for about 30 minutes before grilling. This step promotes even cooking and guarantees that crispy skin you’re aiming for.
Setting Up Your Grill for Perfect Cooking
Before you start grilling, make sure your grill is preheated to between 400°F and 450°F for the best results. Clean and oil the grates to keep the chicken from sticking and to boost flavor. Setting up zones for direct and indirect heat will help you cook the drumsticks evenly without burning them.
Grill Temperature Control
When you set up your grill, aim for a surface temperature between 400°F and 450°F to cook chicken drumsticks evenly while keeping them juicy. Proper grill temperature control is key—you want to use medium-high heat on one side for searing and creating those perfect grill marks, then move the drumsticks to indirect heat to finish cooking without burning.
Whether you’re using gas or charcoal, this two-zone setup guarantees ideal cooking and helps maintain moisture. Keep monitoring the surface temperature, staying above 350°F to prevent drying out the meat. Use an instant-read thermometer to check the internal temperature; chicken drumsticks are safe for consumption at 165°F, but reaching 185°F improves texture.
This balance guarantees your chicken cooks evenly and tastes great every time.
Preparing Grill Grates
Maintaining the right grill temperature is just one part of getting those chicken drumsticks cooked perfectly. Before you start, preheat your grill to about 450°F to create ideal cooking conditions. Next, clean the grill grates thoroughly with a grill brush to remove any leftover residue.
This guarantees a clean surface that enhances flavor and prevents sticking. Once clean, lightly oil the grates using a paper towel dipped in a high-heat neutral oil. This simple step helps keep your chicken from sticking during grilling.
Set up two-zone grilling by keeping one side hot for searing and the other side cooler for indirect cooking. Remember to constantly monitor the temperature to avoid uneven cooking or drying out your drumsticks. Proper preparation of your grill grates is key to perfect chicken every time.
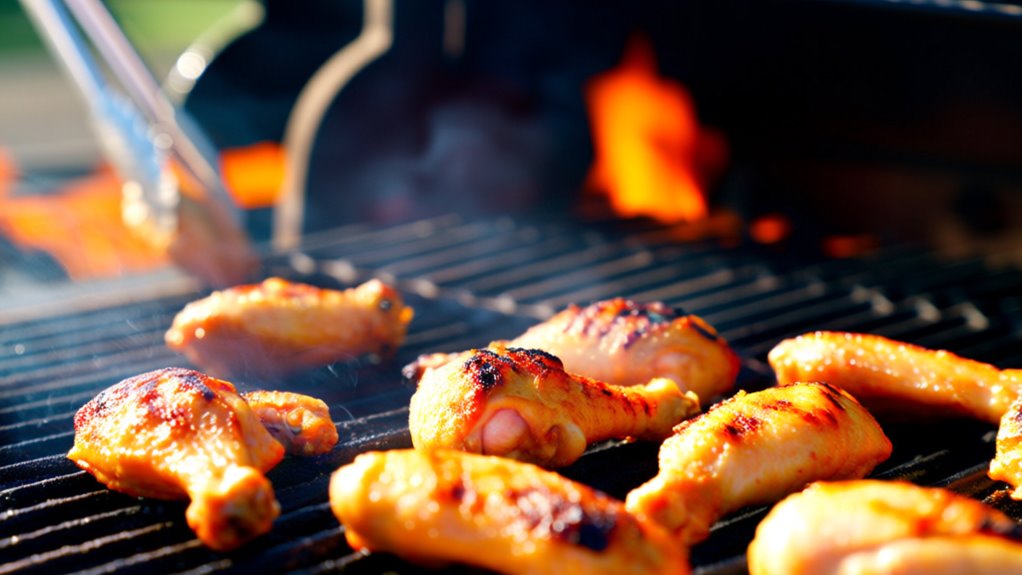
Grilling Chicken Drummies: Direct vs. Indirect Heat
Although grilling chicken drummies might seem straightforward, mastering the balance between direct and indirect heat is key to juicy, flavorful results. When you grill chicken drumsticks, start by searing them over direct heat for 5-7 minutes per side to develop crispy skin and distinct grill marks.
Master the art of grilling chicken drumsticks by balancing direct searing and indirect heat for juicy, crispy results.
Then, move them to indirect heat to cook through evenly without burning. Using a two-zone grilling setup allows you to sear first, then finish cooking gently. Keep the grill temperature between 275°F and 325°F during indirect heat cooking to avoid drying out the meat.
Always use an instant-read thermometer to check the internal temperature; once it hits 165°F, your chicken is perfectly cooked.
- Sear chicken drummies on direct heat for crispy skin and flavor
- Use indirect heat to finish cooking evenly without charring
- Maintain moderate grill temps for tender meat
- Employ two-zone grilling for better control
- Check doneness with an instant-read thermometer to prevent overcooking
Step-by-Step Grilling Timeline
Since proper timing is essential for perfectly grilled chicken drummies, you’ll want to follow a clear step-by-step timeline that guarantees even cooking and juicy results. Start by preheating your grill to medium high heat, about 400°F to 450°F. Place the grilled chicken drumsticks on the indirect heat side to cook evenly without burning.
Turn them every 5 minutes to brown all sides. After about 25 to 30 minutes, brush on BBQ sauce and continue grilling for the last 5 minutes to caramelize the sauce. Finally, remove from the grill and let them rest for 5 minutes to lock in moisture.
| Step | Action |
|---|---|
| Preheat & Setup | Heat grill to 400°F-450°F, indirect heat |
| Cooking & Turning | Grill for 30-35 mins, turning every 5 mins |
| Final Touch & Rest | Apply BBQ sauce last 5 mins, then rest 5 mins |
How to Check for Doneness and Internal Temperature
You’ll want to use an instant-read thermometer to check that your chicken drummies have reached at least 165°F for safety, though 185°F gives you juicier results.
Insert the thermometer into the thickest part without touching the bone to get an accurate reading. Besides temperature, you can look for clear juices and firm meat as visual signs that your chicken is done.
Measuring Internal Temperature
When grilling chicken drummies, checking their internal temperature is the most reliable way to confirm they’re cooked safely and taste great. Use an instant-read meat thermometer to check when the internal temperature reaches the safe internal temperature of 165°F. Insert the thermometer into the thickest part of the drumstick, avoiding the bone for an accurate reading.
Let the drumsticks rest at room temperature for about 5 minutes after grilling to lock in juices and enhance BBQ flavor. Keep your grill at medium heat to guarantee the drumsticks hit the target temperature without drying out.
- Use a meat thermometer to check doneness precisely
- Aim for at least 165°F for safety
- Insert probe into thickest part, not bone
- Rest chicken for juicy, tender meat
- Maintain medium heat for consistent cooking
Visual Doneness Indicators
Although using a meat thermometer is the most accurate way to check if your chicken drummies are done, you can also rely on visual cues. Look for a golden-brown exterior with crispy skin—this is a strong visual indicator that your chicken drumsticks are cooked properly. When you pierce the meat, clear juices running out signal doneness; if the juices are pink, keep grilling.
The meat should easily pull away from the bone, showing it’s tender and fully cooked. Still, always confirm with a thermometer to verify the internal temperature reaches 165°F, the safe minimum for poultry. After grilling, let your chicken rest for about 5 minutes to allow juices to redistribute, enhancing tenderness and flavor before serving.
Applying Sauces and Finishing Touches
Two key steps make all the difference when applying sauces and finishing touches to chicken drummies. First, wait until the internal temperature hits 165°F to avoid cross-contamination and guarantee safe eating. Then, focus on applying sauces like BBQ sauce during the last 5-10 minutes of your grilling recipe.
Wait until chicken reaches 165°F, then apply sauces in the last 5-10 minutes for perfect flavor and safety.
This timing prevents burning and helps you achieve that perfect caramelized glaze.
Keep these tips in mind:
- Use a clean brush or utensil to apply sauces to prevent cross-contamination.
- Brush sauce lightly to allow flavors to meld without overwhelming the chicken.
- For a crispy finish, sear the drumettes briefly over high direct heat after saucing.
- Experiment with different sauces or marinades but save them for the final grilling stage.
- Monitor carefully to prevent burning while maximizing flavor and texture.
Following these steps guarantees your chicken drummies come out flavorful, safe, and beautifully glazed every time.
Tips for Achieving Crispy Skin Every Time
To get that irresistibly crispy skin on your chicken drummies, you’ll want to start by patting them dry to remove any excess moisture. Keeping your chicken drumsticks dry is crucial because moisture prevents the skin from crisping. Next, lightly coat them with oil to help the spice rub stick and encourage that golden crust.
Be sure to preheat the grill to a temperature between 400°F and 450°F so the grates are hot and ready. Cook your drumsticks over indirect heat to avoid steaming, which can make the skin soggy. For the final touch, finish with a quick sear over direct heat to lock in that crispy skin.
Throughout grilling, avoid pressing down on the drumsticks—this squeezes out juices and ruins the texture. Following these steps guarantees your grilled chicken drummies come out perfectly crispy every time, juicy inside with a flavorful crust.
Serving Suggestions for Grilled Chicken Drummies
Once your chicken drummies have that perfect crispy skin, you’ll want to think about how to serve them to make the meal memorable. Grilled chicken drummies shine when paired with classic sides that complement their smoky flavor. Whether you’re hosting outdoor gatherings or a casual family dinner, these serving ideas will elevate your meal.
Perfectly crispy chicken drummies deserve classic sides that highlight their smoky, delicious flavor for any occasion.
- Serve with coleslaw or potato salad to add creamy, tangy contrast.
- Pair with fresh green salad or grilled vegetables for a lighter option.
- Offer BBQ sauce on the side for dipping, enhancing moisture and flavor.
- Include corn on the cob or other classic sides to complete the cookout vibe.
- Complement the meal with invigorating lemonades or iced tea to keep things cool.
These combinations balance rich, smoky chicken with fresh and creamy elements, ensuring your guests enjoy every bite.
Storing and Reheating Leftover Grilled Chicken
Although grilled chicken drummies are best enjoyed fresh off the grill, you can store leftovers safely to savor later. To store leftover grilled chicken, place the drummies in an airtight container and refrigerate for up to 3-4 days.
For longer storage, freeze grilled chicken for up to 3 months—removing the skin before freezing helps maintain quality.
When reheating chicken, use an oven set to 375°F for 10-15 minutes or grill for 5-7 minutes with a light brush of oil to restore crispiness. Always verify the internal temperature reaches 165°F for food safety. Covering with foil in the oven prevents drying out.
| Storage Method | Duration |
|---|---|
| Refrigerate (airtight container) | 3-4 days |
| Freeze (remove skin if desired) | Up to 3 months |
| Reheat (oven 375°F or grill) | 10-15 min or 5-7 min |
Frequently Asked Questions
How Long Does It Take to Grill Chicken Drummies?
It usually takes you about 30 to 35 minutes to grill chicken drummies. You’ll want to turn them every 5 minutes so they cook evenly. Make sure the grill is at medium heat, around 400°F to 450°F, and check the internal temperature with a thermometer.
When it reaches 185°F, they’re tender and juicy. Starting with indirect heat and finishing over direct heat helps you get that perfect crispy skin.
How Long Does It Take Drumettes to Cook on the Grill?
Grilling drumettes is like painting a masterpiece—timing and patience craft perfection. You’ll need about 20 to 25 minutes over medium heat to get them just right. Turn them every 5 minutes to guarantee even cooking, aiming for an internal temperature around 165°F for safety.
Trust your thermometer as your brush, and finish with a crisp char that makes every bite sing with juicy delight.
Is It Better to Grill Chicken at 350 or 400 on a Gas Grill?
You’ll get better results grilling chicken at 400°F on a gas grill. It helps you achieve a nice sear and crispier skin while cooking the meat evenly and juicily. Cooking at 350°F takes longer and risks drying out the chicken.
If you want, start hot at 400°F, then lower the temp to 350°F to finish cooking without burning. That way, your chicken turns out tender and flavorful.
How Often Do I Flip Chicken Drumsticks on the Grill?
You should flip chicken drumsticks every 5 minutes while grilling. This helps them cook evenly and prevents one side from burning. Be gentle when flipping—don’t press down on them, or you’ll lose their juices and end up with dry meat.
Keep turning them regularly until they’re done, then let them rest a few minutes off the grill to lock in all those tasty flavors before serving.
Conclusion
Now you’ve got the know-how to grill chicken drummies like a pro, it’s time to put your skills to the test. Remember, patience is key—don’t rush the process or you’ll miss the boat on those crispy, juicy bites. Follow the steps, keep an eye on the heat, and enjoy the mouthwatering results.
With practice, you’ll have everyone asking for seconds in no time! Mastering how long to grill chicken drummies ensures perfectly cooked, flavorful chicken every time. Keep these tips in mind, and your grilled chicken drummies will be the star of any meal.